Monday, August 28, 2017

Stuffed Cherry Peppers! ooohhhhh aaahhhhhh


What a great time of year!  Gardens are overflowing with beautiful, fresh veggiesRight now, I've got the most beautiful hot cherry peppers. There's nothing like being outside on a warm summer night before an outdoor fire enjoying a nice glass of wine and antipasto (cured meats, olives, artichoke hearts, anchovies, i.e.) with my own stuffed hot cherry peppers.

You can make your own, too.  Here's the recipe.
STUFFED CHERRY PEPPERS
  • Fresh cherry peppers with stems.  You will need enough peppers to fill the jar or jars you want to fill.  Use sweet or hot peppers.  Using both red and green makes the jars look colorful.
  • White vinegar
  • Canola oil
  • Olive Oil (I use extra virgin)
  • Extra sharp provolone cheese (block form not sliced)
  • Prosciutto
  • Fresh Basil
  • Fresh Parsley
  • Fresh Oregano
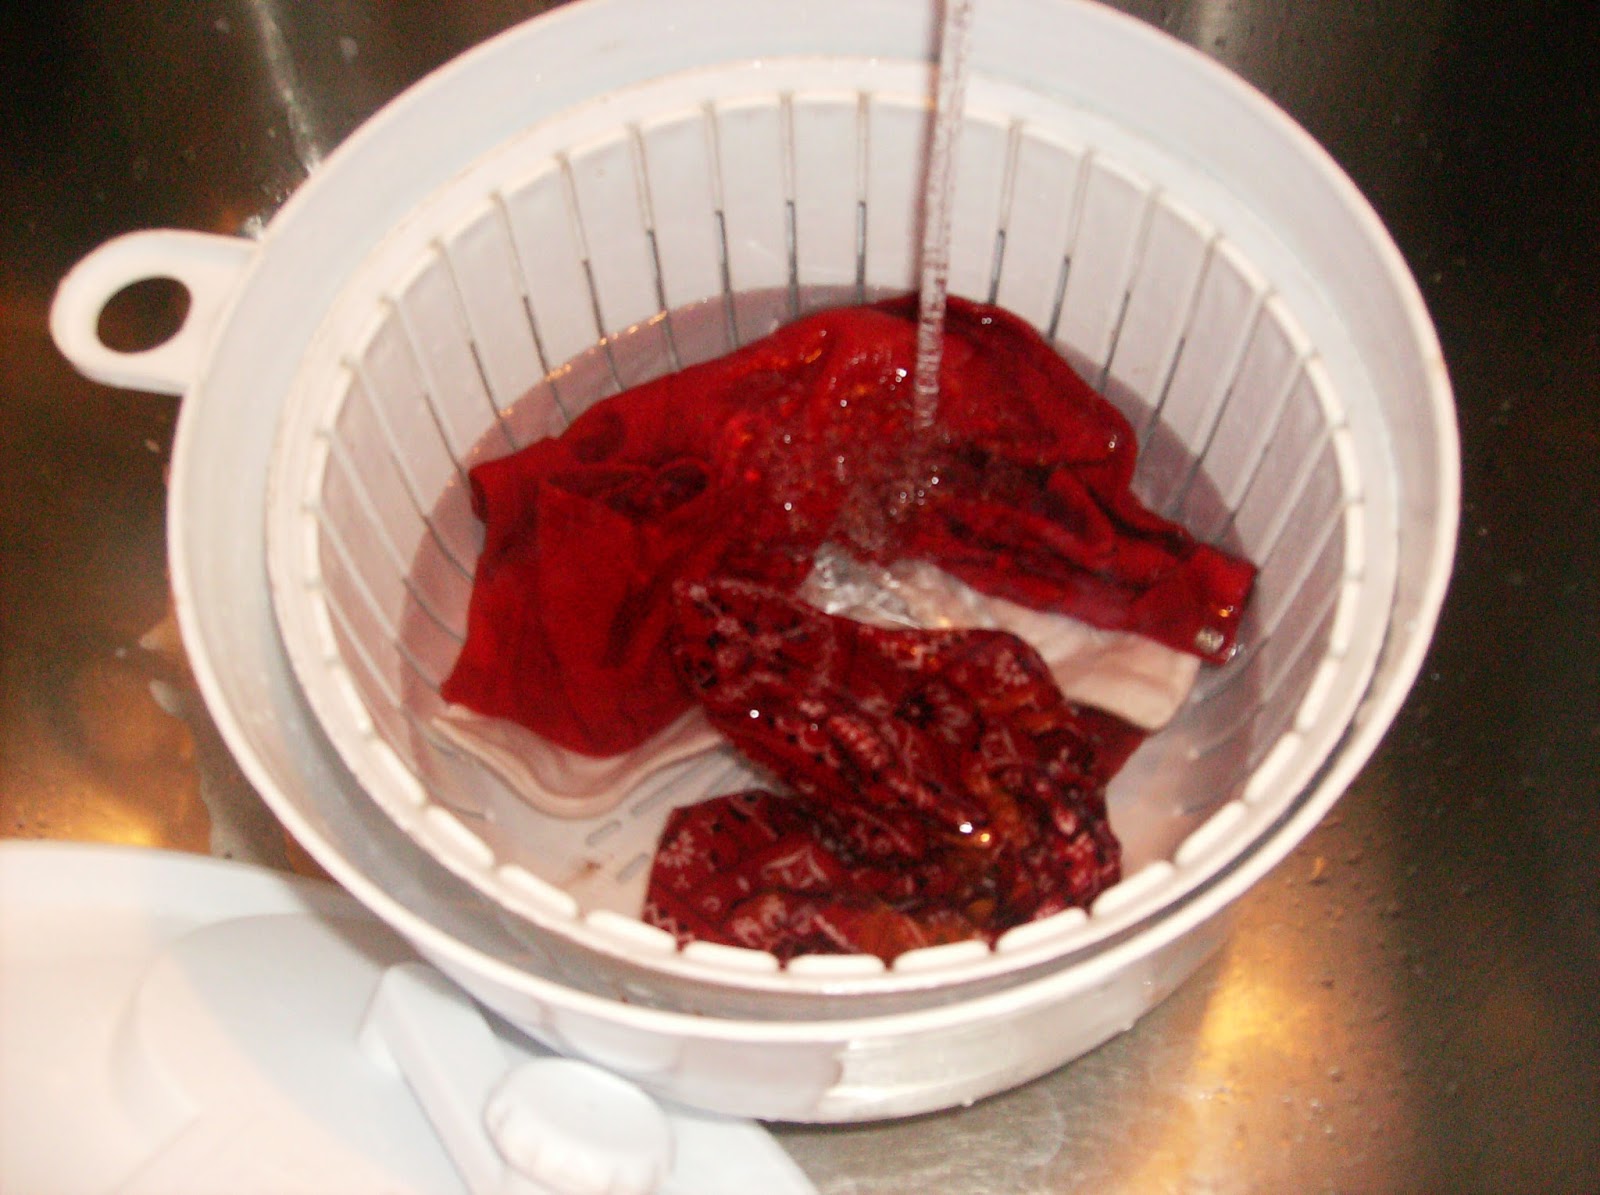
  1. Wash the cherry peppers.  Leave the stems on the peppers.
  2. Place all the peppers in a container.
  3. Pour enough white vinegar over the peppers to cover them.  The peppers will float so you will need to place something on top of the peppers to keep them below the surface of the vinegar.
  4. Let peppers soak for 4 - 7 days.  The longer the soak, the more vinegar you will taste. I put the container in the refrigerator because the vinegar will attract fruit fleas.
Peppers floating in vinegar
Peppers below the surface

 After soaking for the desired time,
Cored peppers, prosciutto & extra sharp provolone cheese
  1. Remove the peppers from the vinegar.
  2. Carefully remove the stem, seeds and core being careful to keep the pepper whole
  3. Cut a square of provolone to a size to fit into the center of the cherry pepper.
  4. Wrap the cheese with some provolone and place inside the cherry pepper.  Make sure it fits snugly so that it doesn't fall out of the pepper.
  5. Place inside a clean ball jar.
  6. Repeat 3-5 until the jar is full.
  7. Sprinkle some basil, parsley and oregano over the peppers in the jar.
  8. Fill the jar at least half way with Canola oil.
  9. Fill the rest of the jar with olive oil.
  10. Place a lid and band on the jar and store in the refrigerator.
  11. Peppers should sit for at least 7 days before eating.  It's all right if the oil looks a bit cloudy and the olive oil may solidify a little.  Before serving, take the jar out of the refrigerator and allow it to sit at room temperature for about 10 minutes so that the olive oil liquifies.


Gustare con un bicchiere di vino rosso e pane croccante.
 (Enjoy with red wine and crusty Italian bread.)

Sunday, October 2, 2016

Just a quick "Hello! I'm still here"

I've been terrible about keeping up with this blog.  And it's not like I don't have anything to say because I do.  Just seems like I'm having a real problem keeping up with Twitter, Facebook, Blogging, Etsy Shop and now my newly opened Scott's Marketplace shop.  I'm still learning though.  Marketing has never been my strong suit LOL!

I'm still creating!  I had that wonderful surge of creativity last November 2016 in preparation for a craft fair.  So I've got a lot of singles in my inventory.  However, I'll be making them into full outfits. I find that my online sales are better as outfits than singles.  So I'm pulling everything together and adding tights, socks, bags, jackets, whatever is needed to create full, fashionable outfits.

AND it's October!  I'm getting my creativity mojo back.  I've got the cutest coats that I'm working on and I've created a pattern for making tights and socks from ladies knee socks which I'm going to try to post for you all in the near future.

Just wanted to give you a quick update and let you know that I'm still here :D

Peace

Sunday, January 3, 2016

DIY Doll Clothes Hangers

Early in December, I sold doll clothes at my first really large craft fair.  It was fun and exciting.  I sewed everyday for a month prior to the fair just to make sure that I had enough doll clothes for people to choose from. But how should I display all my creations?

My husband made me awesome tabletop clothes racks but now I needed doll clothes hangers.  I checked eBay, Amazon, Walmart,Target, etc, trying to find reasonably priced hangers.  What I discovered is that they are expensive plus you don't get free shipping at most sites without a minimum dollar sale.  Next, I hit local store where I found that I could buy a small quantity, have it now but it really wasn't worth the cost.

My husband and I brainstormed and voila! a reasonable, easy DIY alternative.


I went to my local Dollar store and found children's plastic hangers.  They were 6 for $1 and came in white, pink and blue.  My husband used a pair of clippers - the kind used for cutting or pruning small branches - and clipped them just after they little indentation used to hold clothes on the hanger.  If you're concerned about whether the edges might be too sharp or might catch on fabric, you can file them.  However, I use them as is and haven't had a problem.


We discarded the bottom portion in the recycling bin.  The best thing is that these hangers are meant to fit on a regular sized closet rod so you don't have to worry about whether the hanger will fit on a rod.  The doll clothes fit perfectly on the hanger and the indentation is in just the right spot for skinny shouldered clothes, spaghetti straps, etc.

This was such a cool project - easy, colorful, functional, fast and inexpensive. If I had bought 30 doll clothes hangers, I would have spent $24.00 plus shipping!  So to recap:
  • 30 toddler hangers = $5.00
  • Cutting time = 15 minutes
  • 30 doll clothes hangers = priceless
ENJOY and SHARE!


Monday, December 28, 2015

Introducing Nila....

Ahhhh the holidays!  All the running around - all the shopping, wrapping, decorating - all the family!  I love it love it love it!

This Christmas I received the most awesome gift - a My Life Doll - my life as a Student doll.  I know, I know - kind of silly that I should want a doll for Christmas, especially at my age, but I just couldn't help it!  I first saw her during the fall of 2015.  She was on a Clearance Rack on an end cap at my local Walmart.  I remember telling everyone who would listen about this beautiful doll.  Never did I think that my granddaughter would remember.  However, after Christmas dinner, we all sat together, taking turns opening gifts (Believe me 17 people, opening one gift at a time, takes a good 2-3 hours!)


I unwrapped the gift and immediately got choked up!  There she was, the doll I saw months ago - brown skin, brown eyes, sweet puff ball pony tails!  Every doll I have has brown or light hair and light skin which is why I wanted this dark -skinned beauty.  I want little girls to be able to see the clothes I make on dolls that are like them or that they have.

Therefore, I'd like to introduce you to my newest little friend, Nila (pronounced nigh lah) I can't wait to photograph her with my  creations and to show her off.

And with that, I hope you all had a wonderful holiday and I wish you all a very Happy, Healthy and Prosperous 2016.

Sunday, September 27, 2015

Behind the Scenes

My clothing tags
How I love the fall - the cool weather - sleeping without needing AC or fans. I'm a cool weather person anyway.  I find the summer heat exhausting. And I feel my creativity wane.  But with this change in season, I feel invigorated!  And I feel my creative juices flowing again.

I've got so many ideas for doll outfits for 18" dolls like American Girl and Our Generation, 15" dolls like Bitty Baby and Bitty Twin and I'm working on something for 23" dolls like My Twinn.  In fact, I've been re-working some patterns and trying out new purchased patterns.

But first, I thought I'd give you a quick behind the scenes look at the process.  Last year, someone asked me why I make doll clothes to which I explained that it's fun to make doll clothes.  I have a creative outlet and I'm able to have my own business.  She commented that it's probably alot easier, too.  I felt insulted.  Maybe I was being overly sensitive but to be quite honest, it's not easier.  Sewing is sewing and a well made article of clothing takes skill, time and patience.  When making doll clothing, seams are reduced.  So instead of 5/8" seams, I'm sewing with 1/4" and 1/8" seams.  And believe me, sometimes it can be tricky!

I had some really pretty flowered streth fabric along with an extra large woman's size tee shirt that I decided to turn into a cute shorts and tee shirt set.

Cutting out the pieces for these small outfits goes by quickly when I use rotary cutters.  I used to pin everything and handcut with my fabric scissors.

I've assemble all my cut pieces and selected my thread to begin sewing. 
Most seams, as I've said are 1/4" seams.  To give the clothing a nice finished look, I over hand stitch all the edges.  If I had a serger, seaming and finishing would be much easier.  But, alas, I've got a regular sewing machine which works just fine even though it takes a little longer.


I spend a lot of time switching presser feet and changing stitches.  Hey!  Maybe Santa will bring me a serger for Christmas. 


Progress so far..... shorts working pockets are complete.  Front sides attached and tee shirt shoulders are complete as well as the collar along with a last minute decision to attach lace. I think I really like the lacy touch.  What's left, you ask?  Attaching the collar and sleeves, attaching the back of the shorts, the waistband, and oh!  elastic..... wait! can't forget velcro closures!  Way, too much left to do.


And lastly...... adding my tags. Locally (and I mean very locally - like just down the street from me), there is another sewist who makes and sells doll clothes. She sells her doll clothes through her online store as well as in a local consignment crafters shop.  I happened across her items while browsing through the shop and considering if I wanted to put some of my items in the shop.  Her clothes are very nice and well made there were no labels in any of the clothes.  I firmly believe that all handmade items should have the crafters name and, if possible, how to locate the shop/crafter, etc.

Anyway, the outfit is done! and here it is.  Check it out at my MadeMagical shop to see this outfit along with other outfits in my shop!  Hope the rest of your September is awesome!  Peace :D


Monday, September 14, 2015

Introducing My Dolls!


 Here are my dolls!  May I introduce to you Paige, Cece, Caterina and Dana.  These are the doll that I currently own.  For the longest time, my dolls were just dolls that I used for making doll clothes.  They waited around for me to test out new fashions and model finished outfits.  They didn't have names and I didn't even clothe them!  So after taking a quick poll from other like-minded business people and with the aid of 3 of my grandchildren, my lovely dolls were named and, if not wearing complete outfits at this time, at least have underwear! So some details on these dolls...

Paige is a My Twinn doll.  She was rescued from a little second hand consignment shop for $5.  My Twinn dolls are trademarked by The Personalized  Company LLC.  She is a beautiful soft body doll with strawberry blonde - dark blonde hair and light blue eyes.  She has long eyelashes, too.  She is a 23" doll whose basic measurements are Chest 15", Waist 14.5" and Hips: 16".  On the back of her neck it reads "My Twinn An Original Sculpture by Vincent J. DeFilippo.  She is has a cloth body covering her from the shoulders to mid-upper arm and to just above the knee.  She is semi-posable including her feet (at the ankles).
CeCe is an American Girl Doll and the first doll I ever bought.  She's also the doll I used to start MadeMagical.  I found CeCe at a neighborhood yard sale.  There were many many dolls in this box but she was the only American Girl doll.  Oh! The dolls were $3 each!  So she was mine!  She's got lovely long, dark blonde hair and blue eyes.  On the back of her neck reads "Pleasant Company 55H9". This beautiful softbody doll has cloth covering from the base of her neck to her shoulders and down to her hip joints.  She is an 18" doll with basic measurements of Chest 11", Waist 11", and Hips 12.5".  Only her arms and legs are movable at the shoulders and hips.
Catarina is my newest doll.  My granddaughter found her tucked under a table in an old barn antique shop.  She hadn't been cared for in quite sometime so for $15 I took her home and cleaned her up as best as I could.  She is an Our Generation doll made by Battat and which is on the back of her neck.  She has beautiful long dark brown hair with a little bit of wave in it and light blue eyes.  Her body is also covered in cloth the same as CeCe above.  She is also an 18" doll with basic measurements of Chest 11.5", Waist 11.5" and Hips 12".  Like American Girl, only her arms and legs are movable at the shoulder and hips.
And last but not least is little Bitty Baby, Dana.  Dana is also made by the Pleasant Company.  Dana has brown eyes and a smattering of brown hair (painted on).  I found Dana on eBay for $11.  This baby doll is 16" high.  I keep finding reference to Bitty Baby and Bitty Twin as 15" but a physical measurement is showing 16",  This dolls basic measurements are Chest 12", Waist 11.5" and Hips 12".  This doll doesn't stand alone and while the arms and legs move at the shoulders and hips, the baby can't be posed.  Did ya notice that I haven't said if this baby is a boy or a girl?  I don't think it matters much as long as the clothes fit.
So I'll put a synopsis of measurements at the end of this blog to make it easier to know if the doll clothes I make will fit your doll.  Basically, all 18" soft body dolls generally fit clothes made for American Girl and vice versa.  I also have recently found out that Bitty Baby and Bitty Twin dolls will fit each other.  I'm still working on making clothes for Paige (My Twinn 23" doll)  I'm undecided as to whether I want to sell patterns, clothes or both for her.  We shall see.

Check out my MadeMagical webs page (www.MadeMagical.webs.com) to find links to Facebook and my Etsy store.  There are beautiful, reasonably priced cothing for 18" and 15"/16" dolls there - pajamas!  full outfits!  pants!  tees! coats! and of course, dresses!

My next blog...... Doll Panties.........


My Twinn (Paige) - Height:  23", Chest: 15", Waist: 14.5", Hips:  16"
American Girl (CeCe) - Height: 18", Chest: 11", Waist: 11", Hips: 12.5"
Our Generation (Catarina) - Height: 18", Chest: 11.5", Waist: 11.5", Hips: 12" 
Bitty Baby (Dana) -  Height:  16", Chest: 12", Waist: 11.5", Hips: 12"

Note:  Bitty Baby clothes will fit Bitty Twin;
           Clothes are made for the largest measures shown;
           Most other 18" similar dolls usualy fall within these same measurements.

See you soon!

Sunday, August 16, 2015

Washing Doll Clothes - New Use of Kitchen Item


Sometimes little doll clothing just needs to be washed.  Personally I prefer not to include doll clothing with my regular wash and, quite frankly, I'm not a fan of hand washing either.  However, I found a much easier way to wash doll clothes or any other item that requires hand washing.  I use my salad spinner!!!  That's right, my salad spinner.  There are many spinners available but I've found the spinner with a hand crank works the best because you can spin in either direction and as fast or slow as you need.


Here's how I do it...

Wash
    1. Place basket in the spinner.
    2. Add a small amount of detergent and fill about halfway with cool/cold water.
    3. Put the top on the spinner and spin a couple of times to dissolve and spread the detergent.
    4. Remove cover and add some items. Two to 4 small items or 1 larger item (adult blouse). The more you put in the basket, the harder it will be to crank.
    5. Replace the cover and using the crank, spin the item in one direction.  You do not need to spin fast.  If possible, bring the spinner to a stop and spin in the opposite direction.  Continue doing this until you feel the clothing is clean.
    6. Remove cover and lift items out individually.  Check to see if any spots need to additional attention.  You may need to hand rub those spots.
    7. Gently squeeze out any excess water into the same wash water.
    8. Repeat steps 4 - 7 until all items are washed.
    9. When you're through washing, discard the water or use it in a spray bottle for use in cleaning outdoor items or spraying pests on your house &veggie plants.
Rinse


    1. Place basket in base of spinner and fill halfway with water
    2. Follow steps 4 - 7 to rinse under "Wash" above
    3. Change water as needed or repeat as often as needed.  You might want to add a little fabric softener to the final rinse.


 Spin 

    1. Gently squeeze out as much excess water as possible.  You don't need to wring tightly.
    2. Place the basket in the base of the empty spinner.
    3. Place up to 3 items into the basket or one larger item
    4. Put the top on the spinner and spin as fast as possible
    5. Remove the cover, lift the basket out of the spinner and drain out the water.
    6. Repeat these steps (4 and 5) until as much water as possible has been removed from these items.
    7. Repeat for all washed and rinsed items
    8. Air dry in dryer or hang on line. 


Hope this helps!  If anyone has any tips, let me know :D